


How to Protect Your Fingers When Using a Hammer: Complete Safety Guide

Using a hammer looks simple, but one wrong hit can injure your fingers, bruise your hand, or cause lifelong problems. Whether you're doing DIY repairs, gardening tasks, building furniture, or working on a construction site, finger safety is the number one rule when using a hammer.
In this complete guide, we will cover everything you need to know about hammer safety, proper technique, common mistakes, recommended tools, and expert tips to keep your fingers safe. We’ll also introduce one of the best protective accessories you can use today: the Safety Nail Clamp Tool, a small but powerful tool that can prevent injuries.
This article is perfect for homeowners, beginners, students, DIY lovers, and even professional carpenters who want to work safely and efficiently.
Why Hammer Safety Matters
A hammer is one of the most common hand tools in the world, but also one of the most dangerous. The human hand has 27 bones, and the fingers are extremely sensitive. A single blow from a hammer can cause:
- Swelling and bruising
- Cuts and broken nails
- Crushed fingertip
- Deep tissue damage
- Fractures that take months to heal
Many accidents happen because of rushing, distractions, or wrong hammering technique. Simple safety habits can prevent 90% of these injuries.
1. Start With the Right Hammer
Not all hammers are the same. Using the wrong type makes accidents much more likely.
Choose the correct hammer for the job
- Claw hammer: Best for nails and general work
- Ball peen hammer: For metalwork
- Rubber mallet: For gentle tapping without damage
- Small mini hammer: For delicate projects

Proper weight
- Light hammer (8–12 oz) → beginners, small nails
- Medium hammer (16 oz) → general household use
- Heavy hammer → construction work
A hammer that is too heavy makes your hand unstable, increasing the risk of hitting your fingers.
Check the grip
- Handle must be non-slip
- No cracks
- Comfortable length (12–14 inches for normal use)
A good grip helps you control every strike safely.
2. Hold the Nail Properly
The way you hold a nail is the most important part of finger protection.
Correct method:
- Hold nail at the bottom, not the top
- Use only the tips of your fingers
- Keep fingers at least 3-4 cm away from the hammer path
Angle matters
Keep the nail straight. A bent nail increases the chance of the hammer slipping.
Use two-step nailing
- Tap the nail lightly 2–3 times
- Once the nail stands firmly, move your fingers away
- Continue hammering harder without your fingers near
This simple technique prevents 95% of finger injuries.
3. Improve Your Hammer Grip
A poor hammer grip causes the hammer to slip sideways.
Best grip technique
- Hold the handle towards the end
- Keep your wrist straight
- Grip firmly but not too tight
- Swing from your elbow and shoulder, not only the wrist
This gives you maximum power and accuracy.
4. Maintain Full Control of Each Strike
Never hammer blindly. Accuracy is more important than speed.
Rules for safe striking:
- Watch the nail, not the hammer
- Keep your body balanced
- Keep your non-working hand away
- Do not rush
- Make smooth controlled swings
If you are tired or stressed, stop immediately - that’s when most mistakes happen.
5. Prepare Your Workspace
A clean workspace increases safety.
Checklist
- ✔ Proper lighting
- ✔ Stable surface
- ✔ No wet or slippery area
- ✔ No children or pets around
- ✔ Tools arranged neatly
Hammering on unstable surfaces makes injury almost guaranteed.
6. Wear Protective Gear
Simple protection can save your fingers from serious harm.
Recommended safety items
- Anti-vibration gloves
- Cut-resistant gloves
- Safety glasses
- Dust mask (for woodwork)
Gloves add an extra layer of padding that absorbs impact.
7. Use Modern Safety Tools (Highly Recommended)
Today, many people use special tools to hold nails safely.
⭐ Safety Nail Clamp Tool (Must-Have for Beginners)
One of the best inventions to protect your fingers is the Safety Nail Clamp Tool. Instead of holding the nail with your fingers, the clamp grips the nail securely while keeping your hands far away from danger.
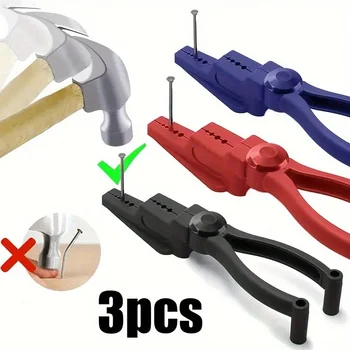
AliExpress Link : Safety Nail Clamp Tool with Sliding Jaw Anti Slip Handle for Finger Protection During Hammering DIY Woodworking and Home Repair
Benefits of a Safety Nail Clamp:
- No need to use your fingers
- Prevents finger injuries
- Holds even small nails firmly
- Perfect for beginners and hobby users
- Saves time and improves accuracy
If you're working on your home, garden, carpentry, or DIY projects, a Safety Nail Clamp Tool is a highly recommended accessory. It’s affordable, long-lasting, and increases overall safety.
Using tools like this shows how modern safety methods can help anyone work confidently and injury-free.
8. Common Mistakes to Avoid
Even experienced people make these mistakes:
❌ Holding the nail too close
This is the number one cause of injuries.
❌ Striking too hard at the beginning
Always start with a soft tap.
❌ Hammering in a hurry
Speed causes loss of accuracy.
❌ Using nails that are too small
Small nails make finger placement risky.
❌ Using a damaged hammer
A loose head or cracked handle is extremely dangerous.
9. Technique for Driving the Nail Correctly
Following the correct step by step technique keeps you safe.
Step 1: Position the nail
Place it where needed and hold it at the bottom.
Step 2: Tap gently
Use 2–3 soft taps until the nail stands.
Step 3: Move fingers away
Once the nail holds itself, remove your hand.
Step 4: Increase hammering force
Now swing harder with proper control.
Step 5: Finish with precision
Once the nail is deep enough, tap lightly for a clean finish.
Practicing this method improves both safety and skill.
10. Use the Right Nails
Choosing the wrong nail makes hammering harder and more dangerous.
- Long nails → use a bigger hammer
- Short nails → avoid holding with fingers, use a tool
- Bent nails → throw them away
- Rusty nails → unsafe and may damage wood
Using the correct nail size makes hammering smooth.
11. Keep Your Fingers in Safe Positions
Always think about where your fingers are before swinging.
Safe finger positions
- Behind the wood
- On the side
- Holding the hammer, not the nail
- On the clamp tool
Never place your fingers on or near the hammer path.
12. Practice Improves Accuracy
Hammering is a skill. The more you practice:
- Your accuracy increases
- You need fewer hits
- Your confidence grows
- You avoid mistakes
- You reduce fatigue
Start practicing on scrap wood before doing real projects.
13. When Should You Stop Hammering?
Stop immediately if:
- You feel tired
- Your hand starts shaking
- The hammer feels slippery
- Nails are bending frequently
- You feel pain in your wrist
Resting helps prevent accidents caused by poor control.
14. Safe Hammering in Special Situations
Hammering in tight spaces
Use smaller hammers or a magnetic nail holder.
Hammering above your head
Wear gloves and safety glasses.
Hammering on metal
Use a ball-peen hammer.
Hammering near edges
Hold the nail at a slight angle for better stability.
15. Teach Children and Family Members
If you work on DIY projects at home, teach your kids or family members:
- Never touch nails during hammering
- Always keep distance
- Use safety tools
- Wear gloves
Awareness creates a safer environment for everyone.
Hammering is simple, but finger injuries are extremely common and often painful. By choosing the right hammer, using proper technique, preparing your workspace, and adopting modern tools like Safety Nail Clamp Tools, you can work safely, confidently, and with greater efficiency.
Whether you’re fixing something at home or working on a new DIY project, always prioritize safety. A few seconds of careful preparation can save your fingers from months of injury.
Stay safe, work smart, and protect your hands they are your most valuable tools.


No comments:
Post a Comment